本文主要包括:
利用Github Pages搭建自己的个人网站
Github Pages建立网站有多种方式
- 创建个人或者组织网站(我们就是要建立这种)
- 这种需要注意,项目名一定要是username
.github.io,否则的话,创建的就是为每个project创建的网站了
- 这种需要注意,项目名一定要是username
- 为每个project建立网站
单纯的使用Githup Pages搭建自己的个人网站还是很简单的,有如下的步骤
- 申请githup账号
- 创建Repositories
- 项目名必须得是username.githup.io,如果不是,最终生成的个人网址就是https://username.github.io/project/
- 在Repositories中生成一个html文件,里面随便写点啥
- 点击Settings -> GitHub Pages -> 选择分支以及文件夹,上面出现绿色的’Your site is published at’就成功了
基于 hexo + github 的个人博客搭建
nodejs安装
到官网下载nodejs安装包
xz -d xxx.tar.xz
tar xvf xxx.tar
配置环境变量
最后检验是否安装成功
node -v
npm -v
hexo安装
- 首先更新apt-get的源,这里为了提高速度,把源改成了aliyun,具体可以看https://www.cnblogs.com/gabin/p/6519352.html
sudo apt-get update sudo apt-get upgrade - 安装hexo
这里如果安装的特别慢,可以设置一下npm的源npm install -g hexonpm config set registry https://registry.npm.taobao.org默认源
npm config set registry https://registry.npmjs.org淘宝源
新的淘宝源 npm config set registry https://registry.npmmirror.com
旧的淘宝源 npm config set registry https://registry.npm.taobao.org
tip: 旧的淘宝源将于2022年05月31日零时起停止服务
hexo 初始化
在本地创建一个文件夹,也就是之后存放代码的地方,例如blog
cd blog && hexo init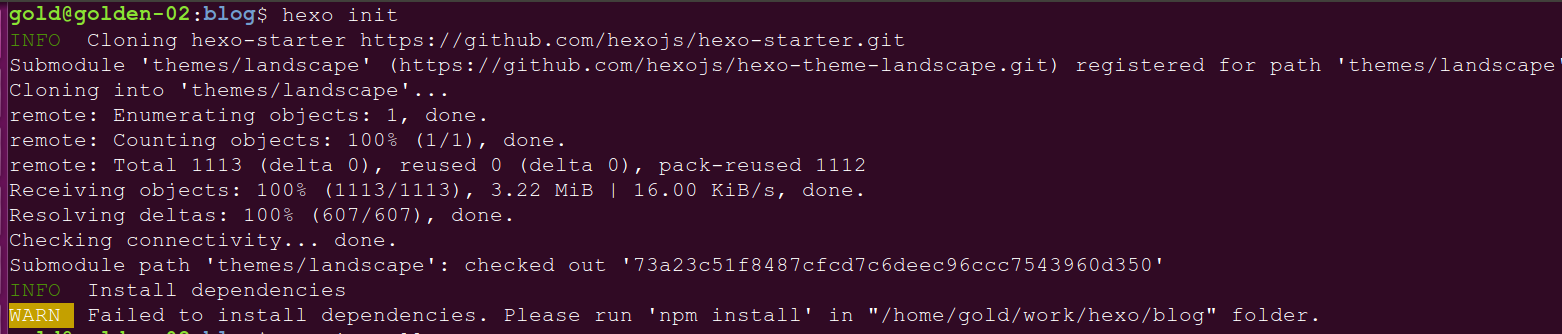
hexo会自动下载一些文件到这个目录,这个过程需要联网
hexo g # 生成html
hexo s # 启动服务
执行以上命令之后,hexo就会在public文件夹生成相关html文件,这些文件将来都是要提交到github去的:
hexo s是开启本地预览服务,打开浏览器访问 http://localhost:4000 即可看到内容
修改主题
这里选择的主题是next,首先下载这个主题
hexo版本5.0以上,可以直接使用
npm install hexo-theme-next@latest启用hexo 5.0,需要nodejs版本在10.13.0以上,可以配置package.json来修改hexo的版本
# 指定版本为^5.0.0
"dependencies": {
    "hexo": "^5.0.0",
    "hexo-generator-archive": "^1.0.0",
    "hexo-generator-category": "^1.0.0",
    "hexo-generator-index": "^2.0.0",
    "hexo-generator-tag": "^1.0.0",
    "hexo-renderer-ejs": "^1.0.0",
    "hexo-renderer-marked": "^3.0.0",
    "hexo-renderer-stylus": "^2.0.0",
    "hexo-server": "^2.0.0",
    "hexo-theme-landscape": "^0.0.3",
    "hexo-theme-next": "^8.1.0"
  }
下载完成后,修改_config.yml中的theme: landscape改为theme: next
发布到githup上
hexo d上传到github
deploy:
  type: git
  repository: git@github.com:xxxn/xxx.github.io.git
  branch: master
此时直接执行hexo d的话一般会报如下错误:
Deployer not found: github 或者 Deployer not found: git原因是还需要安装一个插件:
npm install hexo-deployer-git --saveNext主题配置
菜单设置
菜单包括:首页、归档、分类、标签、关于等等
我们刚开始默认的菜单只有首页和归档两个,不能够满足我们的要求,所以需要添加菜单,打开 主题配置文件 找到Menu Settings
menu:
  home: / || fa fa-home
  #about: /about/ || fa fa-user
  tags: /tags/ || fa fa-tags
  categories: /categories/ || fa fa-th
  archives: /archives/ || fa fa-archive
Next主题样式设置
Next有4种风格供我们选择,打开 主题配置文件 找到Scheme Settings
# ---------------------------------------------------------------
# Scheme Settings
# ---------------------------------------------------------------

# Schemes
#scheme: Muse
scheme: Mist
#scheme: Pisces
#scheme: Gemini
侧栏设置
侧栏设置包括:侧栏位置、侧栏显示与否、文章间距、返回顶部按钮等等
打开 主题配置文件 找到sidebar字段
sidebar:
  # Sidebar Position.
  position: right
  #position: right

  # Manual define the sidebar width. If commented, will be default for:
  # Muse | Mist: 320
  # Pisces | Gemini: 240
  #width: 300

  # Sidebar Display (only for Muse | Mist), available values:
  #  - post    expand on posts automatically. Default.
  #  - always  expand for all pages automatically.
  #  - hide    expand only when click on the sidebar toggle icon.
  #  - remove  totally remove sidebar including sidebar toggle.
  display: always

  # Sidebar padding in pixels.
  padding: 18
  # Sidebar offset from top menubar in pixels (only for Pisces | Gemini).
  offset: 12
  # Enable sidebar on narrow view (only for Muse | Mist).
  onmobile: false
头像设置
打开 主题配置文件 找到Sidebar Avatar字段
# Sidebar Avatar
avatar:
  # Replace the default image and set the url here.
  url: /uploads/avatar.jpg
  # If true, the avatar will be dispalyed in circle.
  rounded: false
  # If true, the avatar will be rotated with the cursor.
  rotated: false
添加分类/标签模块
hexo new page categories # 分类
hexo new page tags # 标签
设置网站缩略图标
把图片放在themes/next/source/images里,然后打开 主题配置文件 找到favicon,将small、medium、apple_touch_icon三个字段的值都设置成/images/图片名.jpg就可以了,其他字段都注释掉
favicon:
  small: /images/favicon-16x16.png
  medium: /images/favicon-32x32.png
  apple_touch_icon: /images/apple-touch-icon.png
  safari_pinned_tab: /images/logo.svg
  #android_manifest: /images/manifest.json
  #ms_browserconfig: /images/browserconfig.xml
设置页面宽度
自我感觉next主题的正文页面太窄了,这里把正文宽度调大,看得舒服点
cd hexo-theme-next/source/css/_variables/编辑base.styl
修改变量值
// Layout sizes
// --------------------------------------------------
$content-desktop                = 700px;
$content-desktop-large          = 800px;
$content-desktop-largest        = 950px;
修改页面字体大小
下载的最新版本的next主题的字体不知为啥很大,看的很不舒服。这里修改一下
修改hexo-theme-next/source/css/_variables/base.styl
//以前的
//$font-size-base           = (hexo-config('font.enable') and hexo-config('font.global.size') is a 'unit') ? unit(hexo-config('font.global.size'), em) : 1em;
//修改成固定值
$font-size-base           = 14px;
添加站点访问计数
# Baidu Analytics
baidu_analytics: 730b9e375674d8f70a08061cd491e24c


# Show number of visitors of each article.
# You can visit https://leancloud.cn to get AppID and AppKey.
# AppID and AppKey are recommended to be the same as valine's for counter compatibility.
# Do not enable both `valine.visitor` and `leancloud_visitors`.
leancloud_visitors:
  enable: true
  app_id: xxxxxxxxxxxxxx
  app_key: xxx
  # Required for apps from CN region
  server_url: # <your server url>
  # Dependencies: https://github.com/theme-next/hexo-leancloud-counter-security
  # If you don't care about security in leancloud counter and just want to use it directly
  # (without hexo-leancloud-counter-security plugin), set `security` to `false`.
  security: false
这里可以到度娘上查,很多教程
代码块风格
next主题下的_config.yml
codeblock:
  # Code Highlight theme
  # Available values: normal | night | night eighties | night blue | night bright | solarized | solarized dark | galactic
  # See: https://github.com/chriskempson/tomorrow-theme
  highlight_theme: normal
  # Add copy button on codeblock
  copy_button:
    enable: true
    # Show text copy result.
    show_result: true
    # Available values: default | flat | mac
    style: default
hexo下的_config.yml
highlight:
  enable: true
  line_number: true
  auto_detect: false
  tab_replace: ''
  wrap: true
  hljs: false
prismjs:
  enable: true
  preprocess: true
  line_number: true
  tab_replace: ''
添加评论插件
next主题本身就支持众多评论插件,这里综合各种插件的优劣,最终选择了valine
修改config.yml之前,先在本地环境安装一下valine
# Install valine
npm install valine --save
因为next本身已经支持,这里只需要在_config.yml里配置下即可
# Valine
# For more information: https://valine.js.org, https://github.com/xCss/Valine
valine:
  enable: true
  appid: SkWNsftcFwwI7sR8WGnbm8G0-gzGzoHsz
  appkey: wHfJCMCqkaxidT5nJyOygkO7
  notify: false # Mail notifier
  verify: false # Verification code
  placeholder: Just go go # Comment box placeholder
  avatar: wavatar # Gravatar style
  guest_info: nick,mail,link # Custom comment header
  pageSize: 10 # Pagination size
  language: # Language, available values: en, zh-cn
  visitor: true # Article reading statistic
  comment_count: true # If false, comment count will only be displayed in post page, not in home page
  recordIP: false # Whether to record the commenter IP
  serverURLs: # When the custom domain name is enabled, fill it in here (it will be detected automatically by default, no need to fill in)
  #post_meta_order: 0
添加本地搜索功能
安装搜索插件
npm install hexo-generator-searchdb --save配置next主题_config_yml
# Local Search
# Dependencies: https://github.com/theme-next/hexo-generator-searchdb
local_search:
  enable: true
  # If auto, trigger search by changing input.
  # If manual, trigger search by pressing enter key or search button.
  trigger: auto
  # Show top n results per article, show all results by setting to -1
  top_n_per_article: 1
  # Unescape html strings to the readable one.
  unescape: false
  # Preload the search data when the page loads.
  preload: false
修改hexo项目的_config.yml,添加如下内容:
# search
search:
  path: search.xml
  field: post
  format: html
limit: 10000如果不添加,那么在hexo s可以搜索,但是deploy后,正式的网页上点击不了搜索
首页添加阅读全文
当前首页会把正文都显示出来,所以显得首页很长,不美观。
在next主题_config.yml配置
excerpt_description: true还需要手动在每篇正文添加<!-- more -->,并写一下文档摘要
配置百度站点收录管理
安装插件:
scriptnpm install hexo-baidu-url-submit --save在根目录 _config.yml 文件里加入以下代码:
scriptbaidu_url_submit:
  count: 100                                # 提交最新的多少个链接
  host: https://gujincheng.github.io/       # 在百度站长平台中添加的域名
  token: aaaaa                              # 秘钥
  path: baidu_urls.txt
token可以在
https://ziyuan.baidu.com/linksubmit/index?site=https://gujincheng.github.io/
普通收录里看到在_config.yml 加入新的deployer
需要修改之前的配置方式,以前没有-,现在需要多加一个type,所以需要加-,注意repository和branch要和type对其scriptdeploy: - type: git repository: git@github.com:gujincheng/gujincheng.github.com.git branch: main - type: baidu_url_submitter这样操作以后,以后每次的
hexo d就会直接提交到百度收录,并会返回一下参数script{"remain":2985,"success":40} #表示成功40条